Setting Up J2EE Development Environment Using Eclipse 3.5.2 and Weblogic 10.3.3
Just to share with everyone how I setup my development environment at work, I'm using Windows 7 and you will need to download 3 softwares:
- Java SE Development Kit 6u24 - i586
- Eclipse Galileo SR2 Packages (v 3.5.2) - Windows 32-bit
- WebLogic Server 10.3.3
Step 1 you download and install the JDK, it's very straightforward, just double click to run and install with default settings.
 |
| JDK Installed to My C Drive |
Step 2 you download Eclipse and extract to whichever folder you like, I put it in my C Drive.
 |
| Eclipse in My C Drive Too |
Step 3 you extract WebLogic to whichever place you like, for me is also C drive.
 |
| WebLogic also in My C Drive |
Now go to your WebLogic directory, edit configure.cmd, add MW_HOME and JAVA_HOME, MW_HOME is the place where you extracted the WebLogic, JAVA_HOME is the place where you installed the JDK.
 |
| Add MW_HOME and JAVA_HOME |
Open up a command prompt and cd to the location of the weblogic directory, for me is C:\weblogic\wls1033_dev, you need to run configure.cmd.
 |
| Run configure.cmd |
Now cd to location of the common binaries at C:\weblogic\wls1033_dev\wlserver\common\bin, run config.cmd.
 |
| config.cmd will open the domain configuration screen |
Click Next to Create a new WebLogic domain, Next again with default settings, then you can change the Domain name if you wish to but I leave it as base_domain and click Next, then configure the administrator name and password to something you can remember and Next, then Available JDKs should be selected so just Next, then check only Administration Server and click Next, listen port listen address all default and Next, finally click Create and then Done.
 |
| Only Create Administrator Server |
Run eclipse.exe, it will take a while to open up, after that go to Servers and right click on the empty space, New then Server.
 |
| Add New Server |
Now you need to download the WebLogic adapter. Sorry I downloaded earlier on so I can't show the next step, anyway after you click on the Download additional server adapters button, it will display a list of server adapters to choose from, just download and install the Oracle WebLogic Tools (or something like that, forgot the exact name), it will take a while, just let it run and when it prompts you to restart Eclipse, just click Yes.
 |
| Download Adapter |
So after Eclipse restart, go to Servers, right click New and Server again, scroll down and expand Oracle, select the Oracle WebLogic Server 11gR1 PatchSet 2, that is for 10.3.3, and only this one will work since your WebLogic is 10.3.3.
 |
| Select 11gR1 PatchSet 2 for 10.3.3 |
Next you have to set your Weblogic home and Java home, just point it to wherever you extracted the WebLogic server, and wherever you installed the JDK, can refer to following screenshot.
 |
| Point to WebLogic and JDK |
Now select the domain that you created and then click Finish.
 |
| Point to my base_domain |
Now you can double click the server to open up the settings, or right click to Start the server.
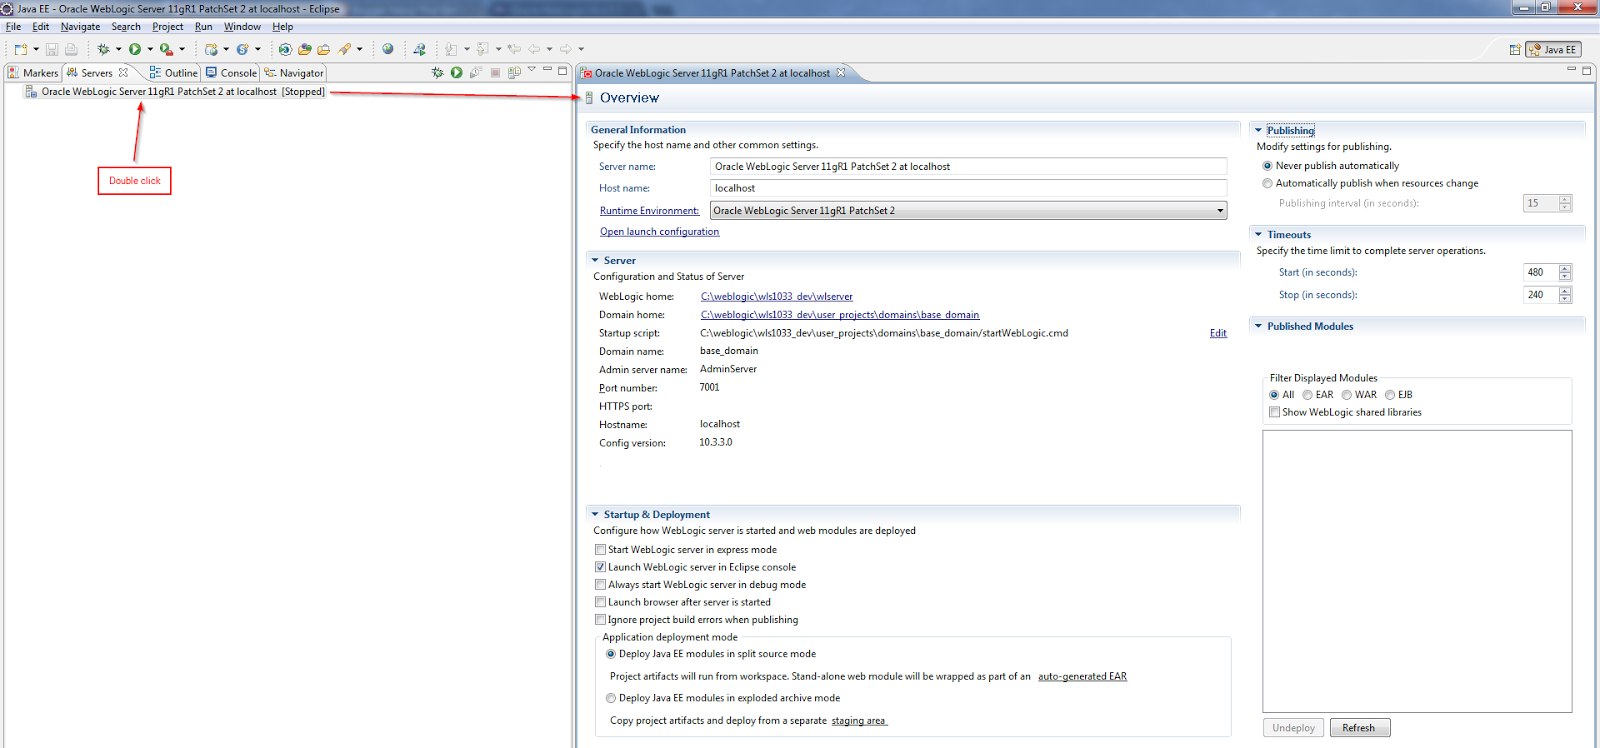 |
| WebLogic Server Added in Eclipse! |
Let's try starting the server! Go to Console, it will show the server log, if you see RUNNING mode means it's up and running.
 |
| RUNNING mode means started successfully |
Ok, now you have a development environment up and running, you are ready to build some application, I'll save it for next tutorial, we can try playing with Spring framework, now I'm still learning at work haha.
You can also use other application server instead of WebLogic, there are other more popular ones such as Tomcat or JBoss, we usually use JBoss for smaller applications, WebLogic is more used by large organizations as their core application server.

Comments